해당 포스팅은 nest.js 9.0.0 버전, typeorm 0.3.x 버전을 기준으로 작성되었습니다.
모든 글은 작성자의 주관이 100% 담겨있기 때문에 부정확할 수 있습니다.
#pre. 터미널을 켜고 프로젝트 폴더로 이동
#0-1. 기초부터 따라하는 nest.js : 터미널 키는 법 + 터미널에서 작업 폴더 이동
윈도우 윈도우는 윈도우+R 버튼을 누른 후, cmd 를 입력하여 터미널을 킵니다. 혹은 윈도우 버튼을 눌러서 검색창에 cmd를 검색하면 터미널이 나올텐데 그걸 실행시켜주시면 됩니다. Mac OS Mac의 경
suloth.tistory.com
위의 링크의 내용을 참고하여 study 폴더로 이동해줍니다.
그리고 code . 명령어를 통해 vscode를 열어줍니다.
오늘은 Article의 CRUD를 작성해 보겠습니다.
자, 여기서 먼저 CRUD란?
Create
Read
Update
Delete
의 앞글자를 따서 만든 말입니다.
따라서, Article CRUD라고 하면 Article에 대한 Create, Read, Update, Delete를 말합니다.
Article 기본 세팅
먼저, article 폴더를 만들어 줍시다. article은 게시글 폴더입니다.
그리고 article 폴더 안에 article.module.ts, article.controller.ts, article.service.ts를 생성해 주도록 합시다.
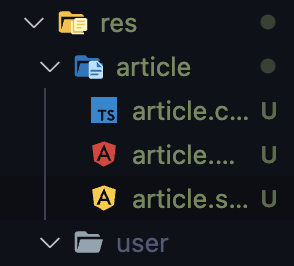
그리고 Module, Controller, Service를 다음과 같이 작성해줍시다. 기본 틀입니다.
ArticleModule
import { Module } from '@nestjs/common';
import { TypeOrmModule } from '@nestjs/typeorm';
import { ArticleEntity } from 'src/entities/article.entity';
import { ArticleController } from './article.controller';
import { ArticleService } from './article.service';

@Module({
  imports: [TypeOrmModule.forFeature([ArticleEntity])],
  controllers: [ArticleController],
  providers: [ArticleService],
})
export class ArticleModule {}
TypeOrmModule을 imports에 주입시켜서 Article 테이블에 접근할 수 있도록 합시다.
ArticleController
import { Controller } from '@nestjs/common';
import { ArticleService } from './article.service';

@Controller('article')
export class ArticleController {
  constructor(private readonly articleService: ArticleService) {}
}
ArticleService
import { Injectable } from '@nestjs/common';
import { InjectRepository } from '@nestjs/typeorm';
import { ArticleEntity } from 'src/entities/article.entity';
import { Repository } from 'typeorm';

@Injectable()
export class ArticleService {
  constructor(
    @InjectRepository(ArticleEntity)
    private readonly articleRepository: Repository<ArticleEntity>,
  ) {}
}
ArticleRepository를 생성자에 주입시켜서 Article 테이블에 SQL 쿼리문을 날릴 수 있도록 합니다.
그리고 AppModule에 ArticleModule을 등록해줍시다.
import { Module } from '@nestjs/common';
import { TypeOrmModule } from '@nestjs/typeorm';
import * as path from 'path';
import { AppController } from './app.controller';
import { AppService } from './app.service';
import { UserModule } from './res/user/user.module';
import { ConfigModule, ConfigService } from '@nestjs/config';
import { AuthModule } from './auth/auth.module';
import { ArticleModule } from './res/article/article.module';

console.log(`.env.${process.env.NODE_ENV}`);

@Module({
  imports: [
	...
    UserModule,
    AuthModule,
    ArticleModule,
  ],
  controllers: [AppController],
  providers: [AppService],
})
export class AppModule {}
Create
기본 틀을 만들었으니, CRUD에 해당하는 함수를 작성해봅시다!
ArticleService
일단 먼저 createArticle이라는 함수를 만들어 줍시다.
그리고 그 안에 await this.articleRepository.save 함수를 사용해서 Article Create를 구현할 수 있습니다.
  async createArticle() {
    await this.articleRepository.save({});
  }
위에서 {} 안에서 ctrl + space를 누르면 자동완성 목록이 뜹니다.
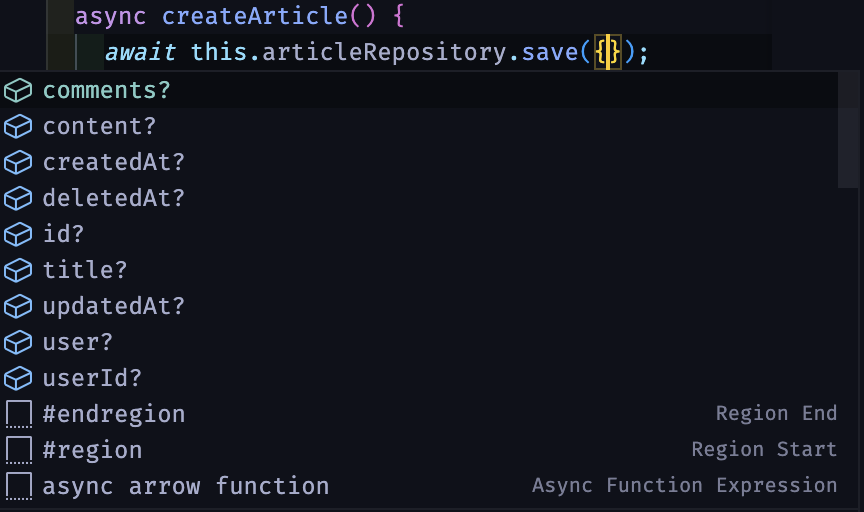
위의 목록에서 자신이 필요한 속성을 찾을 수 있습니다.
게시글을 만들기 위해서는 title, content, userId가 필요합니다. 나머지 id와 createdAt, updatedAt, deletedAt, comments등은 자동으로 생성이 되거나, 게시글을 생성할 때는 필요하지 않은 것들입니다.
따라서, 함수의 인자로 title, content, userId를 받아서 이를 save함수의 객체의 인자로 넘겨주면 끝입니다!
  async createArticle(title: string, content: string, userId: string) {
    await this.articleRepository.save({
      title: title,
      content: content,
      userId: userId,
    });
  }
여기서, save함수는 insert후에 해당 게시글이 잘 생성되었는지 select를 해서 해당 게시글의 정보를 가져옵니다.
그래서 이 정보를 변수에 담고 리턴해줍시다.
  async createArticle(title: string, content: string, userId: string) {
    const article = await this.articleRepository.save({
      title: title,
      content: content,
      userId: userId,
    });

    return article;
  }
ArticleController
ArticleService에서 createArticle 함수를 만들었으면, 사용자에게 서비스를 제공하기 위한 Controller 함수가 필요합니다.
여기에도 똑같이 함수이름을 createArticle로 해서 만들어 봅시다.
그래서 게시글을 '생성'하는 함수이니 Post요청이 들어오면 실행되게 하는게 약속입니다. 따라서 Post 데코레이터를 붙여봅시다.
  @Post()
  async createArticle() {

  }
이렇게 되면, /article 경로로 Post요청을 보낼 시, 컨트롤러의 createArticle 함수가 실행됩니다.
그리고 아까 ArticleService에서 만들었던 createArticle함수를 사용해봅시다.
title, content, userId가 필요하니 그것도 인자에 넣어줍시다.
  @Post()
  async createArticle() {
    const article = await this.articleService.createArticle(
      title,
      content,
      userId,
    );

    return article;
  }
ArticleService의 createArticle에서 return한 article정보를, 변수 article에 담아서 리턴합니다.
여기서 return 하는 data는 클라이언트에게 전송됩니다.
그리고, 위의 함수에서 title, content, userId를 인자로 받아야 합니다.
Post 함수에서는 Body 데코레이터를 통해서 Post 요청과 함께 받은 body의 데이터를 읽어올 수 있습니다.
(클라이언트=프론트 에서 Post요청을 보낼때, 생성해야하는 것에 대한 데이터를 req.body라는 변수에 담아서 보냅니다)
따라서, title과 content는 body에서 받아올 수 있습니다.
  @Post()
  async createArticle(@Body() body) {
    const title = body.title;
    const content = body.content;

    const article = await this.articleService.createArticle(
      title,
      content,
      userId,
    );

    return article;
  }
하지만, 여기서 userId는 body로 받아오지 않습니다. 왜일까요?
유저가 게시글을 작성할 때, 유저는 이미 로그인이 되어있는 상태이기 때문에 userId를 따로 받아올 필요가 없습니다.
가드와 유저 데코레이터를 이용해서 userId를 받아올 수 있습니다.
User 데코레이터를 만드는 방법은 아래의 포스팅을 참고하시기 바랍니다.
#10-1. 기초부터 따라하는 Nest.js : User Decorator
해당 포스팅은 nest.js 9.0.0 버전, typeorm 0.3.x 버전을 기준으로 작성되었습니다. 모든 글은 작성자의 주관이 100% 담겨있기 때문에 부정확할 수 있습니다. #pre. 터미널을 켜고 프로젝트 폴더로 이동 ht
suloth.tistory.com
우리는 JwtAuthGuard를 통하여 로그인이 되어있는지 확인할 수 있습니다. 따라서 JwtAuthGuard를 컨트롤러에 붙여주고 User 데코레이터를 사용하면 됩니다.
  @UseGuards(JwtAuthGuard)
  @Post()
  async createArticle(@Body() body, @User() user) {
    const userId = user.id;

    const title = body.title;
    const content = body.content;

    const article = await this.articleService.createArticle(
      title,
      content,
      userId,
    );

    return article;
  }
}
그리고, git으로 commit 해봅시다. 원래, commit은 함수 혹은 기능 단위로 하기 때문에 지금 commit을 해줍시다.
#0-2. 기초부터 따라하는 Nest.js : Git과 Github 사용법
이 글은 아래의 포스팅에 이어서 작성하는 포스팅입니다. https://suloth.tistory.com/45 #1. 기초부터 따라하는 Nest.js : Nest.js 초기 설정 Nest.js란? node.js의 백엔드 프레임워크 중 하나입니다. node.js에는 수
suloth.tistory.com

Read
create함수를 만들었으니, 이제 read함수를 만들어 봅시다.
read함수는 말 그대로 게시글을 읽는 함수입니다.
게시글은 게시글 하나만 따로 볼 수도 있지만, 게시글 목록도 불러와야 합니다.
하지만, 게시글 목록을 불러오는 건... 생각보다 복잡하기 때문에 여기서는 게시글 하나의 내용을 불러오는 함수만 작성해보도록 하겠습니다.
ArticleService
ArticleService에 getArticle이라는 함수를 만들어 줍시다.
그리고 그 안에서 articleRepository의 findOne함수를 이용합시다.
findOne함수는 일치하는 데이터 하나만 찾는 함수입니다.
어차피 게시글 하나의 내용만 보면 되는데, 여러 개를 찾을 필요가 없죠.
  async getArticle(articleId: string) {
    const article = await this.articleRepository.findOne({
      where: {
        id: articleId,
      },
    });

    return article;
  }
게시글을 찾을 때는 게시글의 id만 있으면 됩니다. 그래서 findOne 함수의 where안에서 id값이 articleId와 일치하는 게시글만 찾으면 됩니다. 물론, 해당 articleId값은 클라이언트(프론트)에서 넘겨줄 겁니다.
그리고 이렇게 찾은 article을 리턴해주면 됩니다.
ArticleController
이번엔 함수 이름을 서로 다르게 해볼까요?
ArticleController에서 getArticle함수를 사용자에게 제공하기 위해 readArticle이라는 함수를 생성해줍시다.
무언가를 받아오는 작업이기 때문에 Get 요청이 들어오면 함수가 실행되게 작성합시다.
  @Get()
  async readArticle() {
    const article = await this.articleService.getArticle(articleId);

    return article;
  }
이렇게 작성하면 됩니다. 쉽죠?
그런데 여기서 articleId를 어디서 받아와야 할까요?
위의 포스팅에서 참고를 하자면, Body데코레이터를 사용해서 받아와야할 것 같습니다. 하지만, 아닙니다..
Body는 Post 요청에서 사용되는 데코레이터라고 생각하시면 됩니다(물론 update시에도 사용됩니다). Get요청 시에는 req.body에 아무런 데이터가 담겨있지 않습니다.
따라서, articleId를 다른 곳에서 받아와야 합니다.
그곳은 바로! url입니다. url의 Param이라는 값을 받아와서 그 값을 articleId로 사용합니다.
(참고로, url에 변수의 값을 집어넣는 행위는, 보안상 남이 알아도 상관없는 변수일 때 사용합니다. articleId는 누가 알아도 보안상 큰 문제가 없기 때문에 사용합니다)
  @Get('/:id')
  async readArticle(@Param('id') id) {
    const articleId = id;

    const article = await this.articleService.getArticle(articleId);

    return article;
}@Get('/:id')는 param에 담긴 값을 id로 사용하겠다는 뜻입니다. 이로써 /article/1 과 같은 경로로 Get요청이 들어올 경우, id에는 1값이 대입되고, readArticle함수가 실행됩니다.
@Param('id') id는 Param중 id를 가져와서 id라는 변수에 담는다는 뜻입니다.
@Param() param처럼 사용해서 param.id 로 사용도 가능합니다.
git에 commit해줍시다.
#0-2. 기초부터 따라하는 Nest.js : Git과 Github 사용법
이 글은 아래의 포스팅에 이어서 작성하는 포스팅입니다. https://suloth.tistory.com/45 #1. 기초부터 따라하는 Nest.js : Nest.js 초기 설정 Nest.js란? node.js의 백엔드 프레임워크 중 하나입니다. node.js에는 수
suloth.tistory.com

Update
자, 그러면 이제 수정하는 함수를 만들어 봅시다!
ArticleService
먼저, ArticleService에 modifyArticle 함수를 만들어 봅시다.
게시글을 수정하려면
어떤 게시글을 수정할지에 대한 articleId가 필요하고
게시글을 어떤 내용으로 수정할지에 대한 title, content가 필요합니다.
  async modifyArticle(articleId: string, title: string, content: string) {
    const updateResult = await this.articleRepository.update(
      { id: articleId },
      {
        title: title,
        content: content,
      },
    );

    return { affected: updateResult?.affected };
  }
함수의 인자로 articleId와 title, content를 받아서 articleRepository의 update함수에 대입합니다.
update함수의 첫 번째 인자는 조건입니다. 어떤 게시글을 수정할 것인지를 정하는 거죠.
update함수의 두 번째 인자는 수정내용입니다. 해당 게시글의 어느 부분을 어떻게 수정할지 정합니다.
그리고 update함수의 결과 값에는 affected라는 속성이 담깁니다.
affected 속성은 해당 로직이 DB에 영향을 미쳤는지, 안미쳤는지 알려주는 속성입니다.
affected가 1이면 DB가 수정되었다는 뜻이고, 0이면 알수없는 오류로 수정되지 못했다는 뜻입니다.
그래서 affected값을 리턴해줍시다.
그리고 글을 수정하려면 해당 글이 로그인된 유저의 글이어야 합니다.
그러므로 userId를 받아서 해당 유저의 글이 맞는지 확인할 필요가 있습니다.
  async modifyArticle(
    userId: string,
    articleId: string,
    title: string,
    content: string,
  ) {
    const article = await this.articleRepository.findOne({
      where: {
        id: articleId,
        userId: userId,
      },
    });

    if (!article) {
      throw new UnauthorizedException('본인의 게시글이 아닙니다.');
    }

    const updateResult = await this.articleRepository.update(
      { id: articleId },
      {
        title: title,
        content: content,
      },
    );

    return { affected: updateResult?.affected };
  }
articleId와 userId를 이용해서 게시글을 찾는데, 게시글이 없다면 UnauthorizedException을 던지는 로직을 추가해줍시다.
ArticleController
로그인
ArticleController에서 modifyArticle서비스를 사용자에게 제공해줄 updateArticle함수를 만들어 봅시다.
update를 할 때는 보통 Put요청을 보냅니다. (Patch도 있습니다만, Put을 많이 사용합니다)
Patch는 일부분만 수정하라는 의미이고 Put은 전체 다 수정하라는 의미입니다.
여기서 Put을 주로 사용하는 이유는... (정확하지는 않습니다) 예를들어 게시글에서 제목만 수정한다고 요청을 보낸다면, title에 대한 데이터만 받을 텐데, 이를 착각하여 content에는 null값을 넣을수도 있는 그런 사태가 발생할 수도 있기 때문이라고 들었습니다.
그러므로 우리는 Put을 애용해줍시다.
어차피 HTTP 메소드는 개발자간의 약속이니, 약속만 잘 지킨다면 어느 메소드를 사용해도 상관없습니다.
그리고 글을 수정하려면 해당 게시글이 본인의 게시글이어야되니, 당연히 로그인이 되어있는지 확인을 해야합니다.
Put 또한 클라이언트쪽에서 body에 데이터를 담아서 요청을 보낼 수 있습니다. 그래서 Body 데코레이터를 사용해서 title과 content를 불러올 수 있습니다.
  @UseGuards(JwtAuthGuard)
  @Put('/:id')
  async updateArticle(@Param('id') id, @User() user, @Body() body) {
    const userId = user.id;
    const articleId = id;

    const title = body.title;
    const content = body.content;

    const res = await this.articleService.modifyArticle(
      userId,
      articleId,
      title,
      content,
    );

    return res;
  }
생각보다 복잡하니 천천히 따라쳐보시기 바랍니다.
그리고, commit을 해줍시다.
#0-2. 기초부터 따라하는 Nest.js : Git과 Github 사용법
이 글은 아래의 포스팅에 이어서 작성하는 포스팅입니다. https://suloth.tistory.com/45 #1. 기초부터 따라하는 Nest.js : Nest.js 초기 설정 Nest.js란? node.js의 백엔드 프레임워크 중 하나입니다. node.js에는 수
suloth.tistory.com

Delete
Delete는 예전 강의에서 말씀드렸다시피, Hard Delete와 Soft Delete가 있습니다.
#5. 기초부터 따라하는 Nest.js : 간단한 DB구조 설계 및 TypeORM을 이용한 Entity 작성
해당 포스팅은 nest.js 9.0.0 버전, typeorm 0.3.x 버전을 기준으로 작성되었습니다. 모든 글은 작성자의 주관이 100% 담겨있기 때문에 부정확할 수 있습니다. #pre. 터미널을 켜고 프로젝트 폴더로 이동 ht
suloth.tistory.com
저희는 SoftDelete를 구현할 겁니다.
ArticleService
ArticleService에 removeArticle 함수를 만들어 줍시다.
이 함수내에서 articleRepository의 softDelete함수를 이용하면, DB의 deleted_at칼럼에 데이터가 들어가게 되어 softDelete가 구현이 됩니다. (기본적으로 다른 orm함수들을 사용하면 deleted_at이 null인 데이터만 가져옵니다)
  async removeArticle(articleId: string) {
    await this.articleRepository.softDelete({
      id: articleId,
    });
  }
따라서 위와 같이 함수를 작성할 수 있습니다.
하지만, 여기서도 본인이 작성한 게시글만 지울 수 있게 하기 위한 검증이 필요합니다.
Update때와 같이 find문을 한 번 더 쓰는 것도 좋은 방법이겠지만, 귀찮으니 조건에 userId를 추가하겠습니다.
  async removeArticle(userId: string, articleId: string) {
    const deleteResult = await this.articleRepository.softDelete({
      id: articleId,
      userId: userId,
    });

    return { affected: deleteResult?.affected };
  }
여기서도 affected값이 담깁니다. 1은 삭제가 되었다는 뜻이고, 0은 안되었다는 뜻입니다.
만약, 삭제가 안되었다는 메시지를 클라이언트에 전달하고 싶으면, 중간에 if문을 추가해서 에러를 던져줍시다.
ArticleController
ArticleService에서 작성한 removeArticle 함수를 사용자에게 제공하기 위한 deleteArticle 함수를 만들어 봅시다.
해당 함수는 Delete라는 요청을 받으면 실행됩니다.
그리고 어떤 게시글인지 알아야 삭제를 할 수 있기 때문에 param이 필요합니다.
또한, 본인의 게시글만 삭제할 수 있기 때문에, 유저가 로그인이 되어있는지 확인해야 합니다.
body는 필요없습니다.
  @UseGuards(JwtAuthGuard)
  @Delete('/:id')
  async deleteArticle(@Param('id') id, @User() user) {
    const userId = user.id;
    const articleId = id;

    const res = await this.articleService.removeArticle(userId, articleId);

    return res;
  }
따라서 위와같이 함수를 작성할 수 있습니다.
그리고, git으로 commit 해줍시다.
#0-2. 기초부터 따라하는 Nest.js : Git과 Github 사용법
이 글은 아래의 포스팅에 이어서 작성하는 포스팅입니다. https://suloth.tistory.com/45 #1. 기초부터 따라하는 Nest.js : Nest.js 초기 설정 Nest.js란? node.js의 백엔드 프레임워크 중 하나입니다. node.js에는 수
suloth.tistory.com

동작 확인
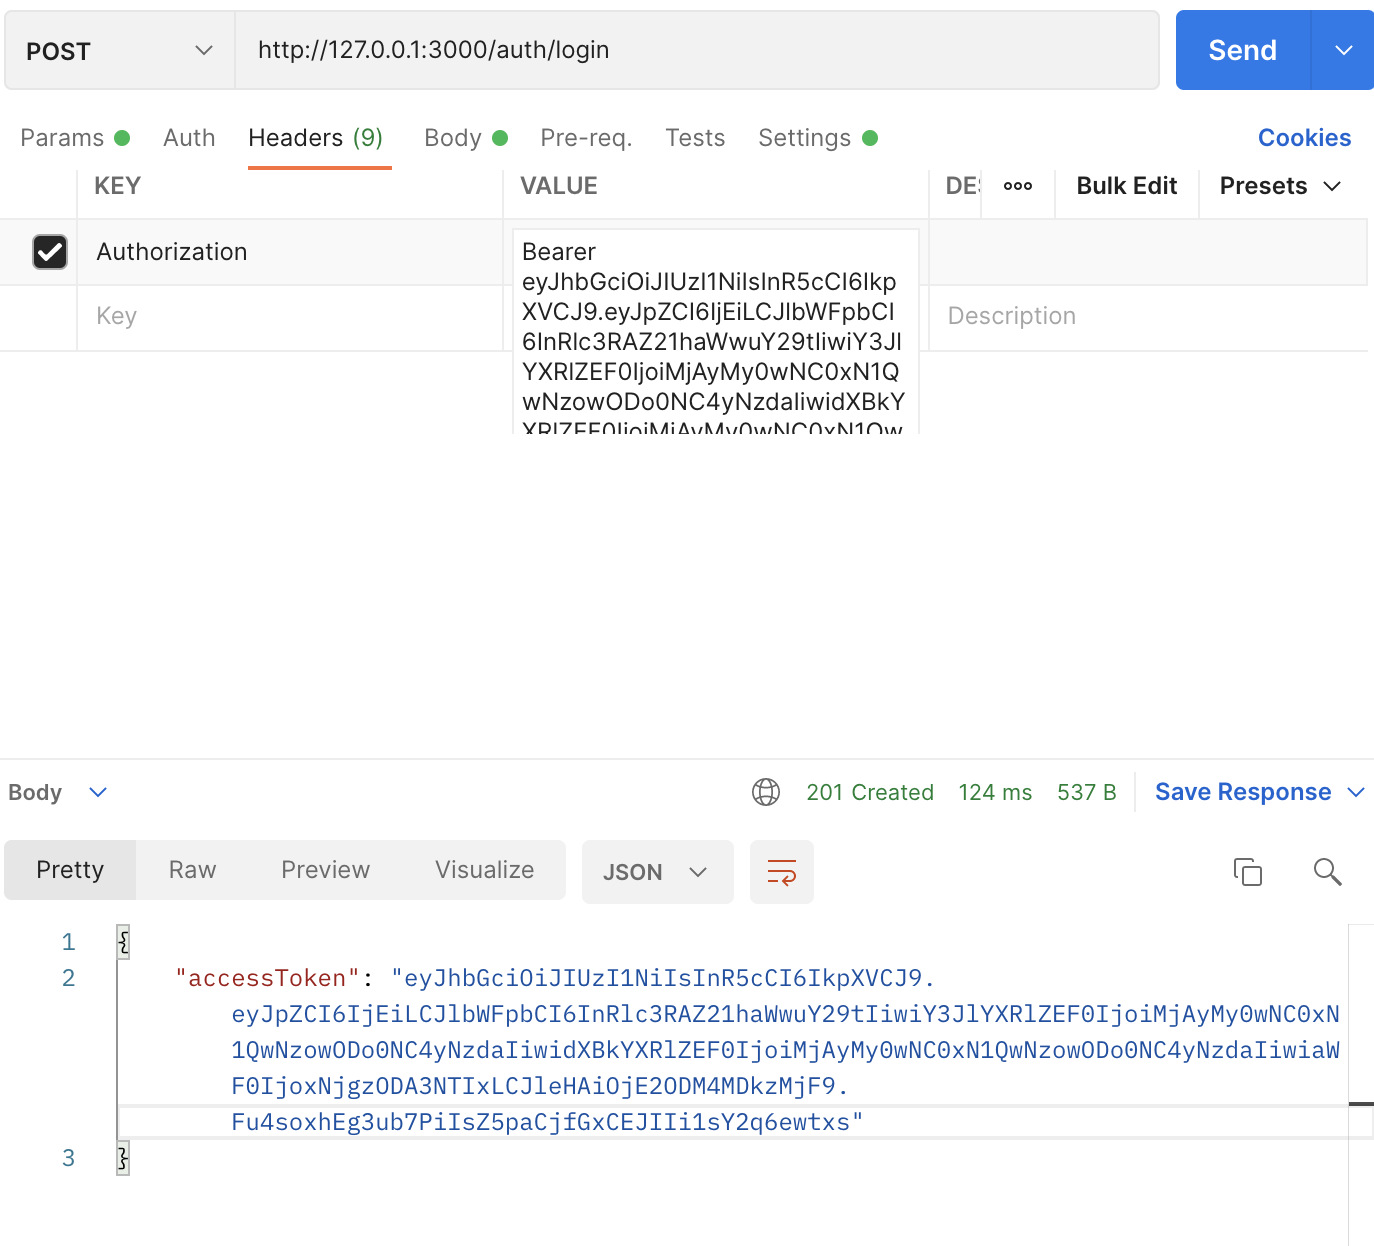
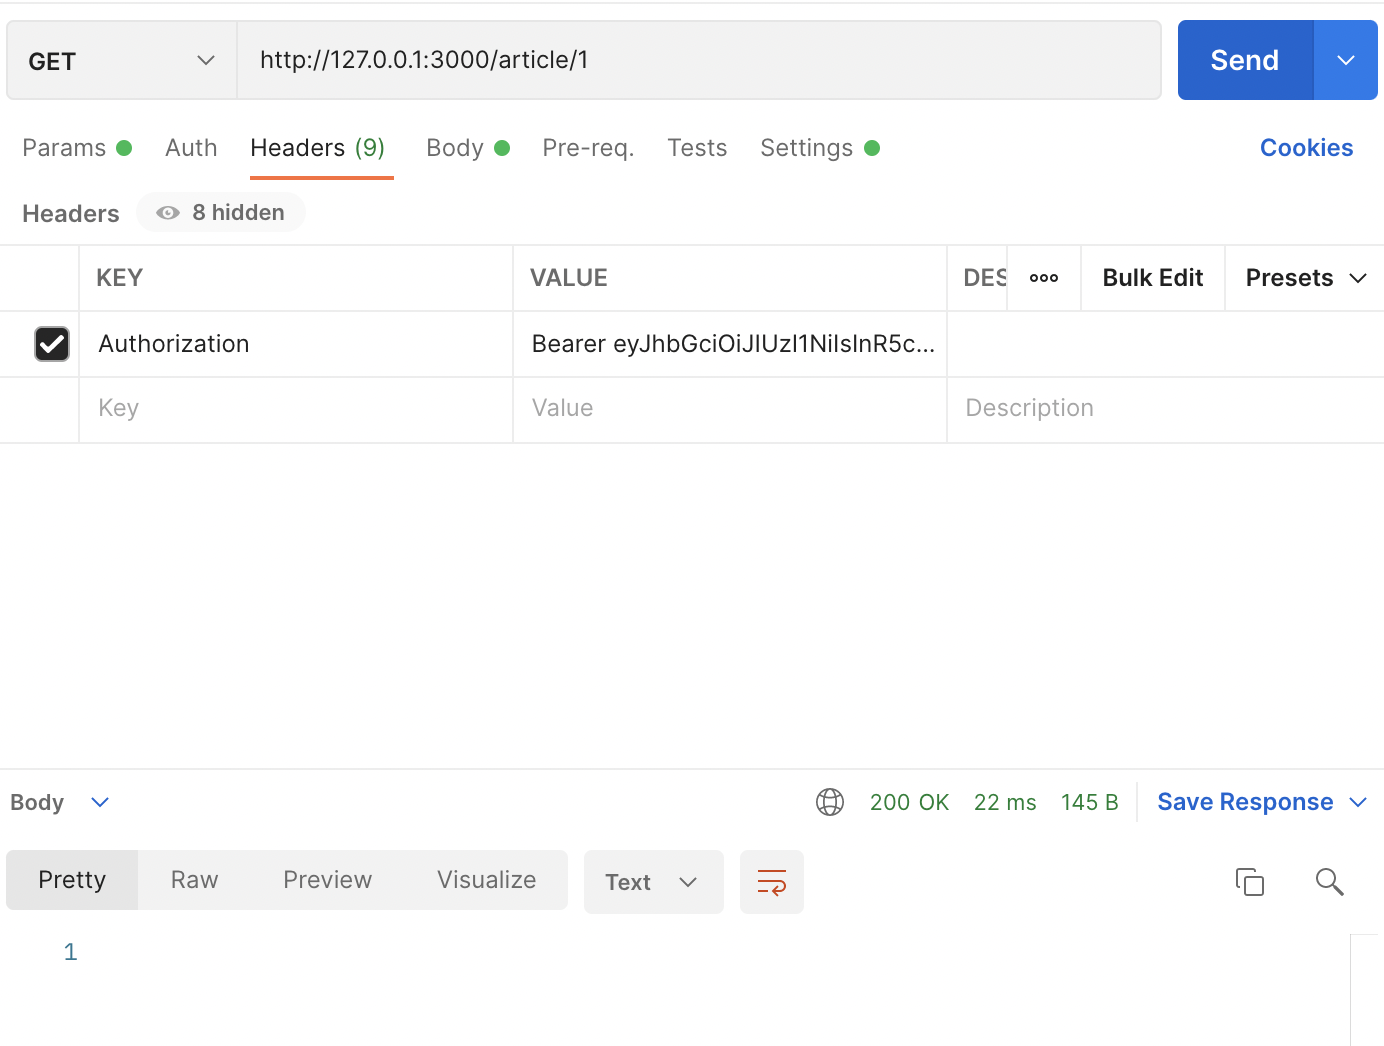
1. 먼저 로그인을 해줍니다. 로그인을 하고, accessToken의 값을 Header의 Authorization에 Bearer accessToken값 형태로 넣어줍시다.
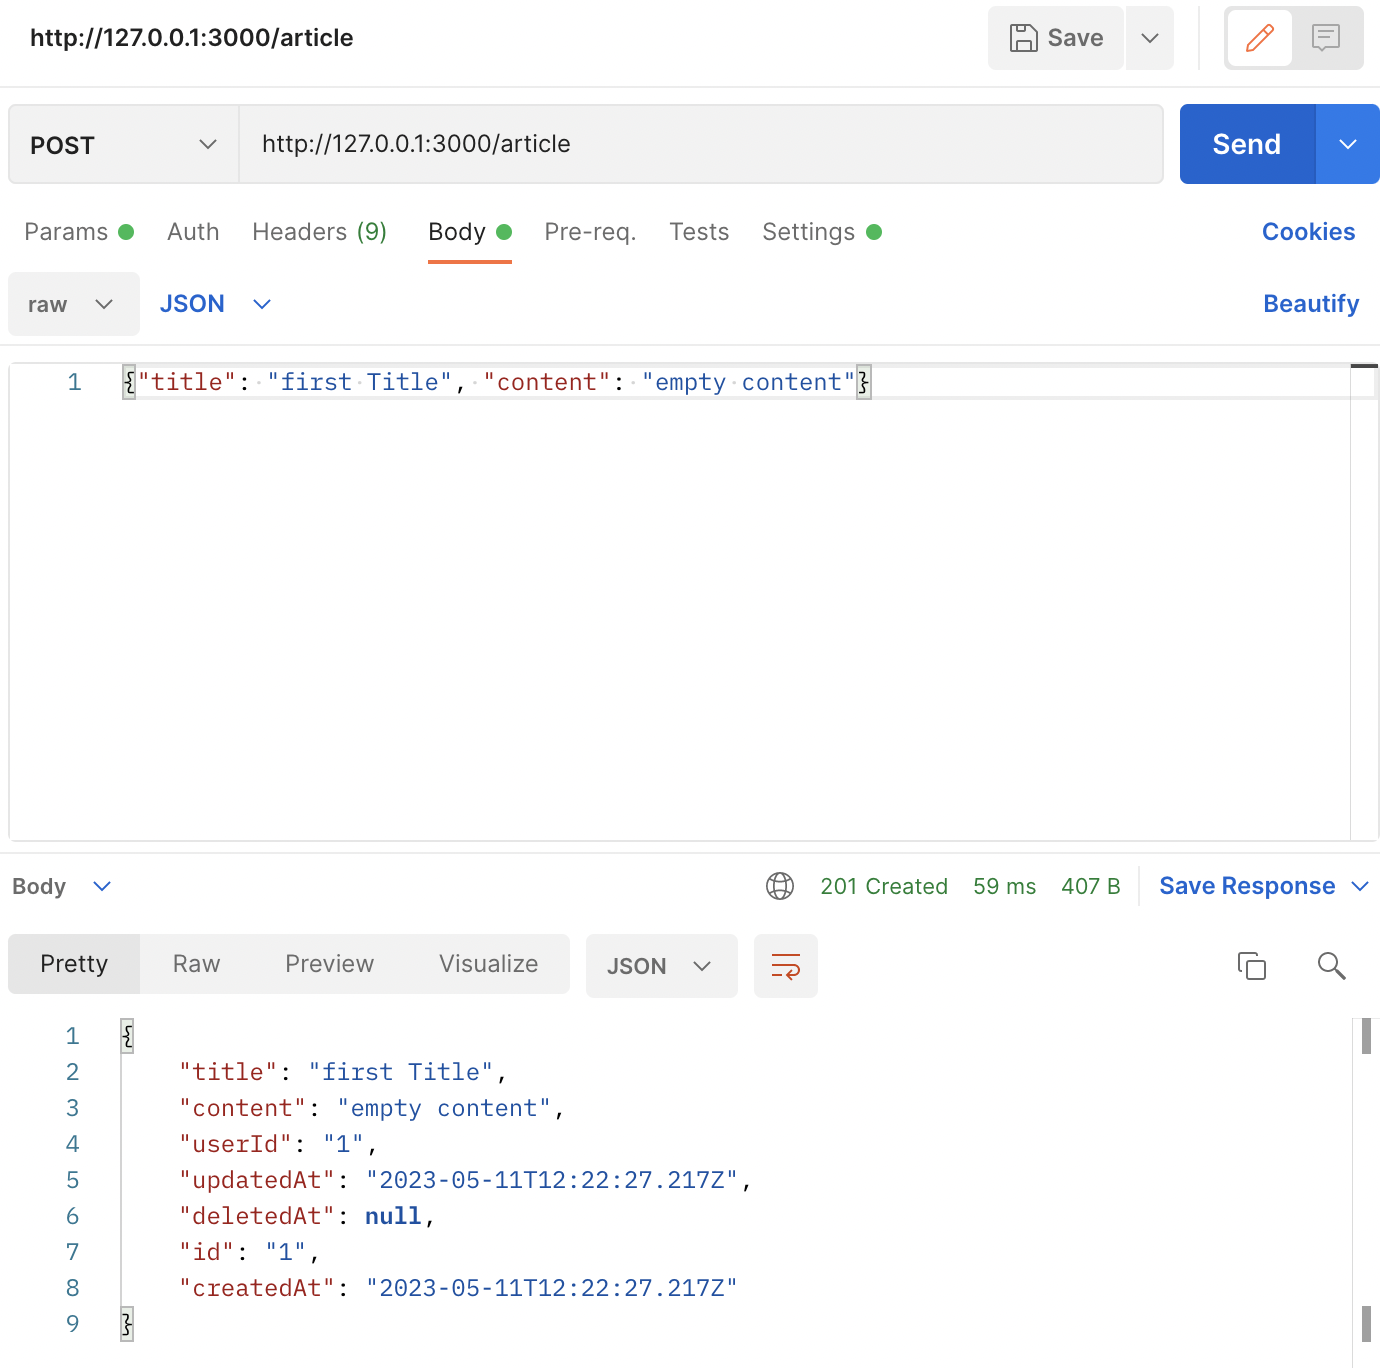
2. Article 생성 : 로그인을 했다면, http://127.0.0.1:3000/article 이라는 url로 Post요청을 보내 게시글을 생성합니다. 이 때, body에 title과 content값이 들어가야 합니다.
3. Article Read : 게시글을 생성했으니, 게시글을 불러와 봅시다. http://127.0.0.1:3000/article/articleId 라는 url로 방금 만들었던 게시글을 불러와봅시다. 여기서, articleId는 전에 생성된 article의 Id값이 들어가야합니다.
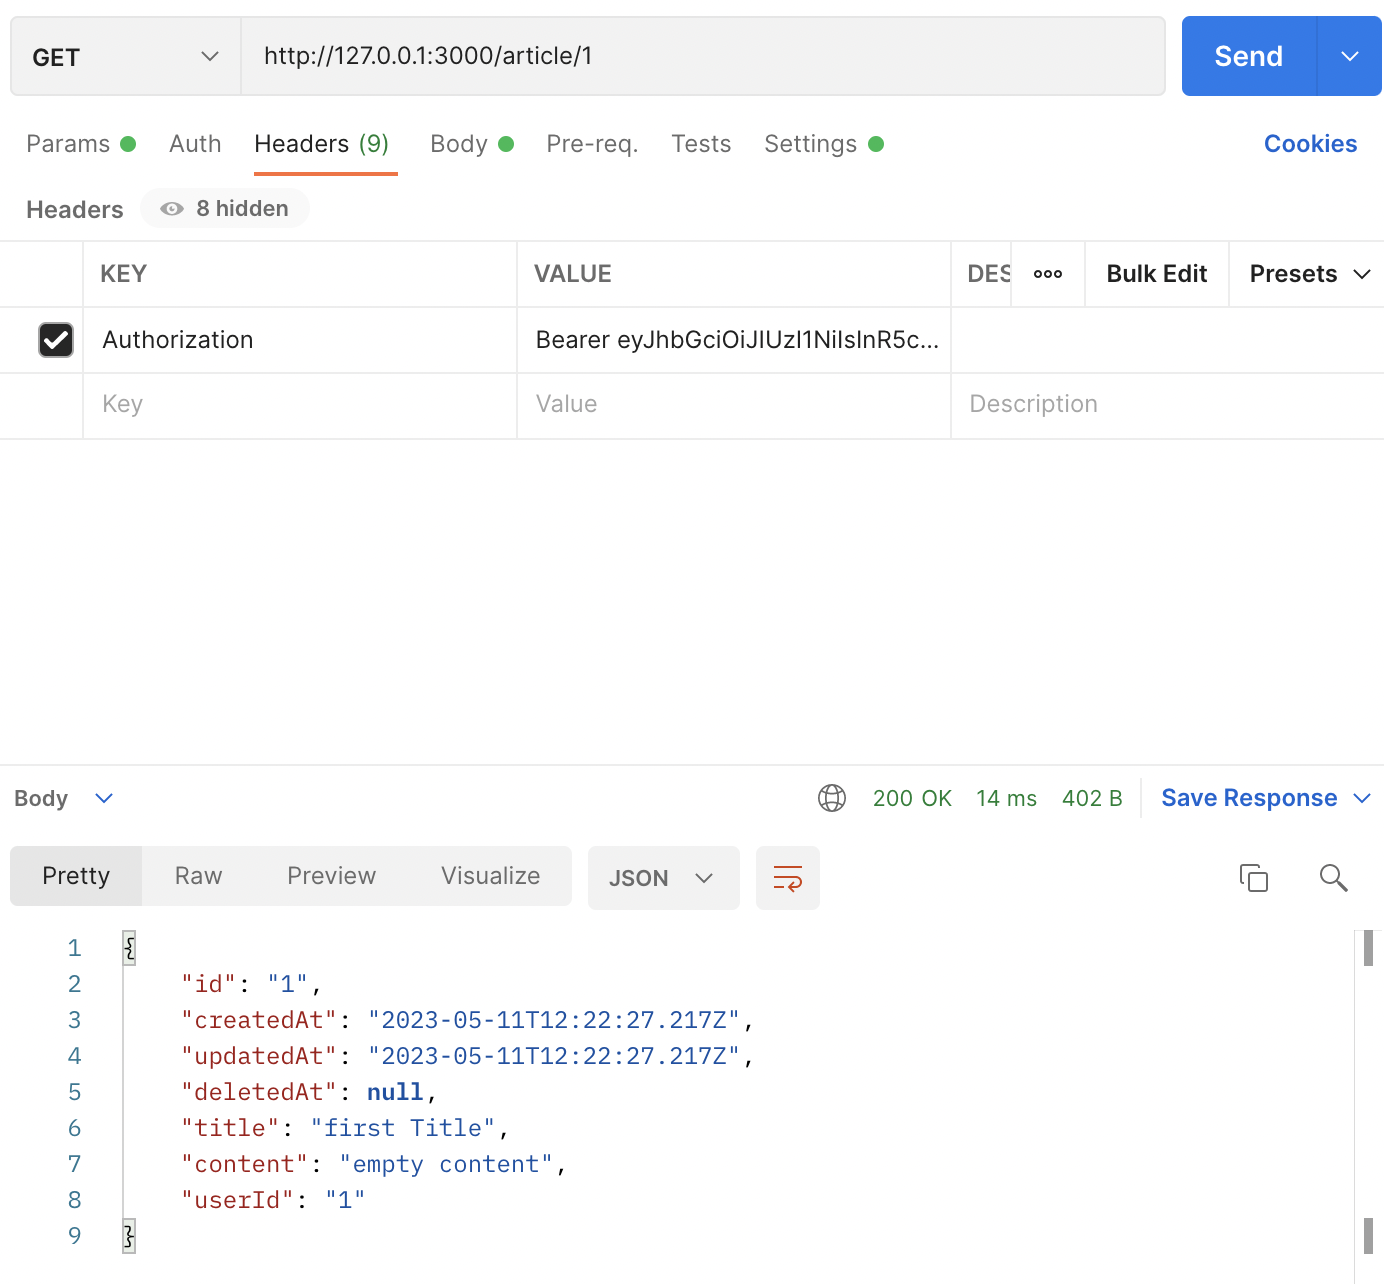
4. Article Update : 게시글을 수정해봅시다. http://127.0.0.1:3000/article/articleId 의 url로 Put 요청을 보내봅시다. 그리고 body에 수정할 title과 content 값을 넣어줍시다.
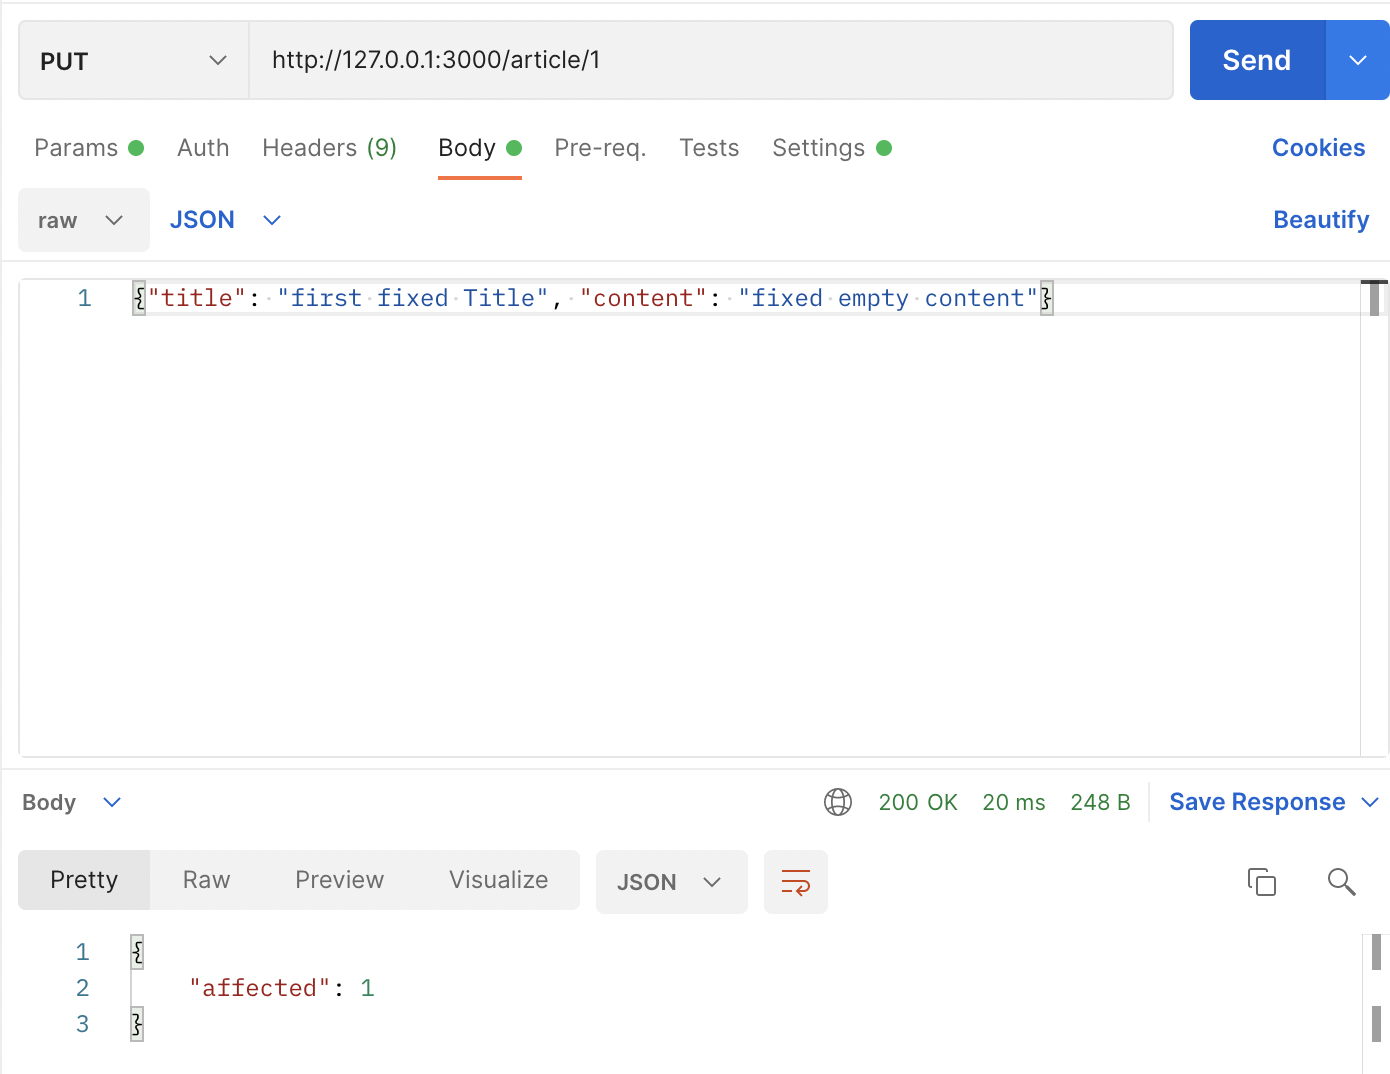
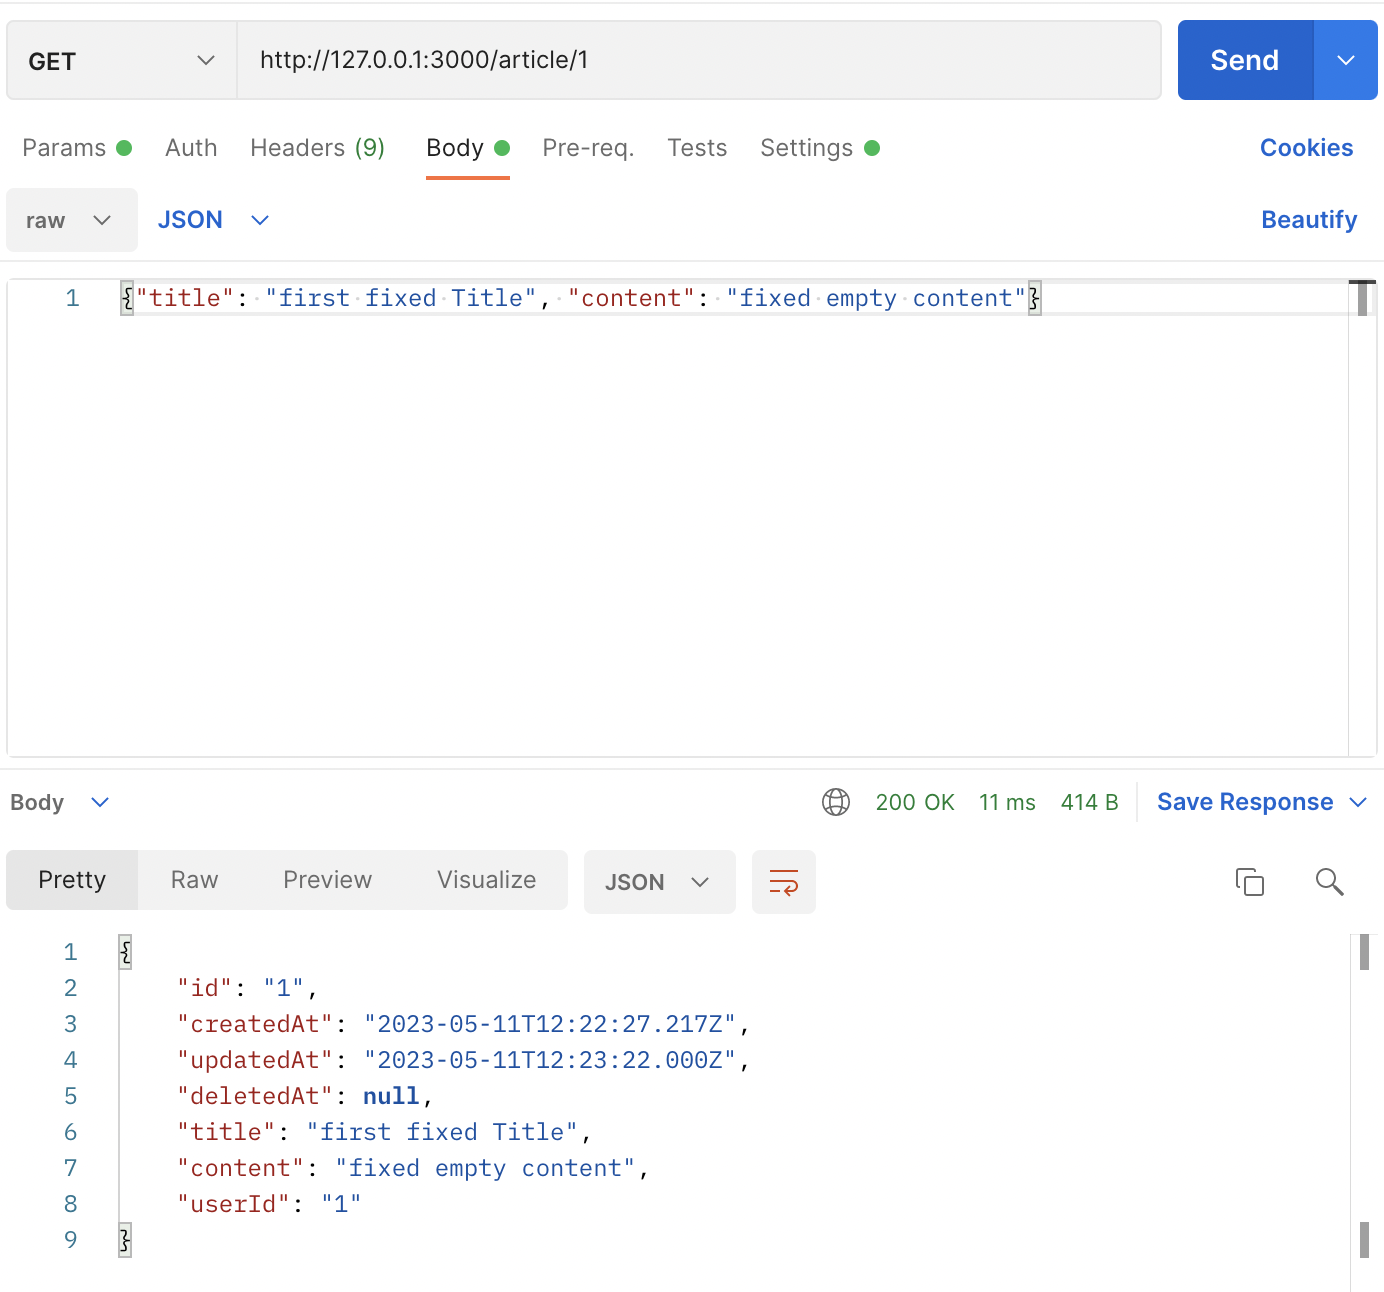
5. 게시글을 수정하였으니, 수정한 게시글이 제대로 적용되는지 Read해봅시다.
6. Article Delete : 게시글을 삭제해봅시다. http://127.0.0.1:3000/article/articleId 로 Delete 요청을 보내봅시다. 로그인만 되어있으면 됩니다.
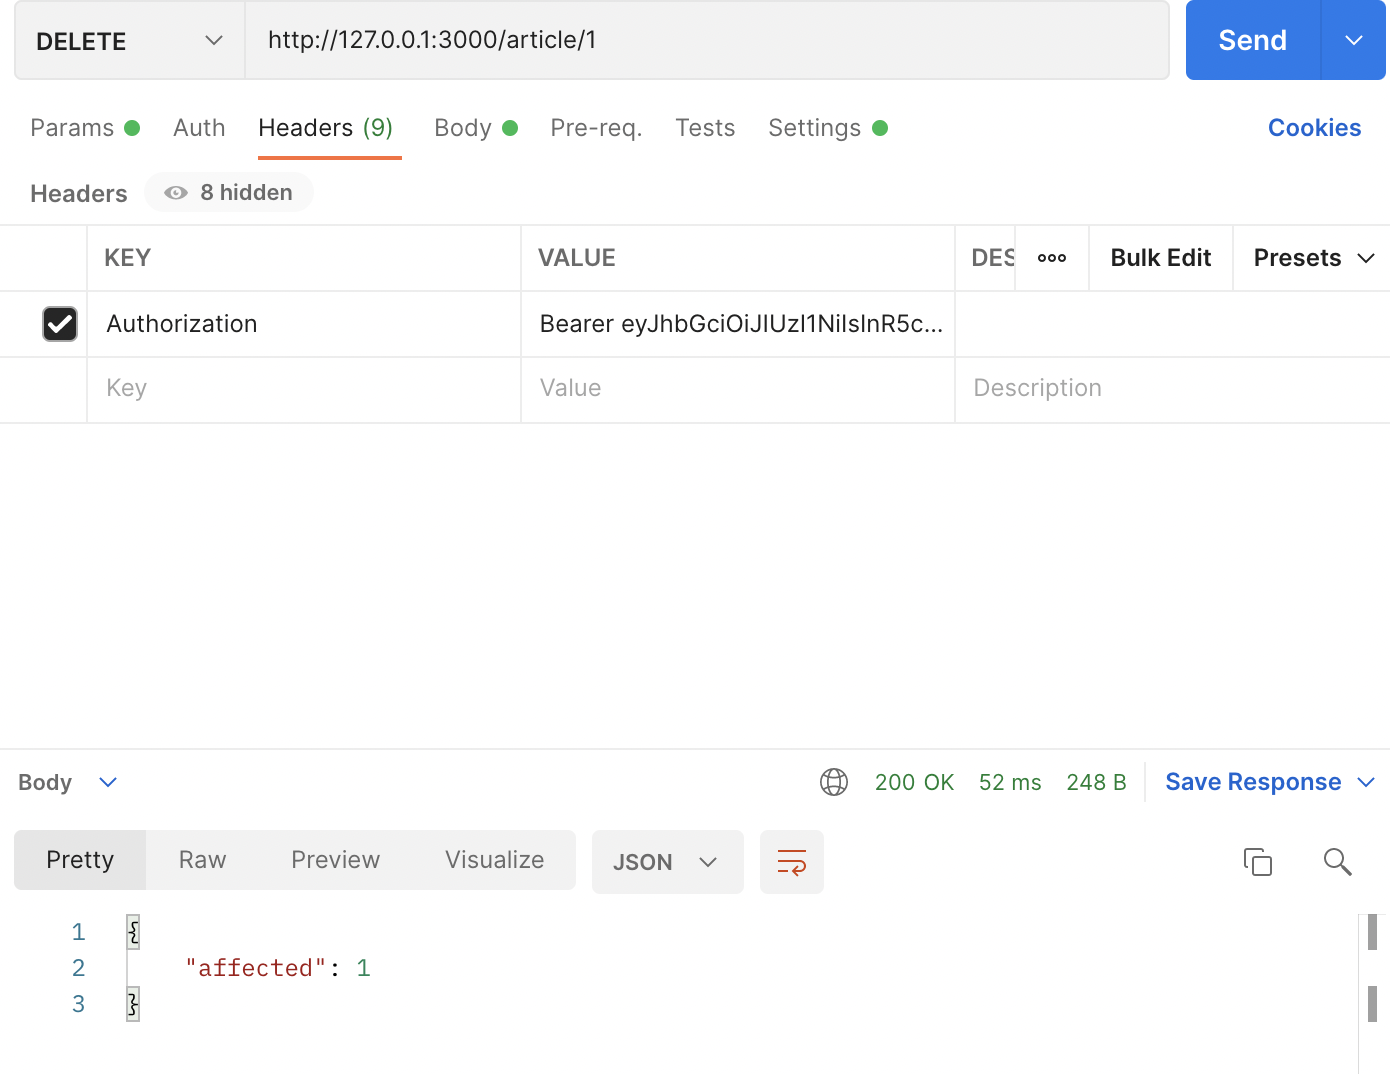
7. 삭제된 게시글을 Read해보면, 결과값에 아무것도 뜨지 않습니다. 나중에 시간나면, 이 경우에 에러 던지는 로직을 만들어보시는 것도 좋아보입니다.
이상으로 Article CRUD 편을 마치겠습니다. 감사합니다~
전체 코드
article.module.ts
// article.module.ts
import { Module } from '@nestjs/common';
import { TypeOrmModule } from '@nestjs/typeorm';
import { ArticleEntity } from 'src/entities/article.entity';
import { ArticleController } from './article.controller';
import { ArticleService } from './article.service';

@Module({
  imports: [TypeOrmModule.forFeature([ArticleEntity])],
  controllers: [ArticleController],
  providers: [ArticleService],
})
export class ArticleModule {}
article.controller.ts
// article.controller.ts
import {
  Body,
  Controller,
  Delete,
  Get,
  Param,
  Post,
  Put,
  UseGuards,
} from '@nestjs/common';
import { ArticleService } from './article.service';
import { JwtAuthGuard } from 'src/auth/guards/jwt-auth.guard';
import { User } from 'src/decorators/user.decorator';

@Controller('article')
export class ArticleController {
  constructor(private readonly articleService: ArticleService) {}

  @UseGuards(JwtAuthGuard)
  @Post()
  async createArticle(@Body() body, @User() user) {
    const userId = user.id;

    const title = body.title;
    const content = body.content;

    const article = await this.articleService.createArticle(
      title,
      content,
      userId,
    );

    return article;
  }

  @Get('/:id')
  async readArticle(@Param('id') id) {
    const articleId = id;

    const article = await this.articleService.getArticle(articleId);

    return article;
  }

  @UseGuards(JwtAuthGuard)
  @Put('/:id')
  async updateArticle(@Param('id') id, @User() user, @Body() body) {
    const userId = user.id;
    const articleId = id;

    const title = body.title;
    const content = body.content;

    const res = await this.articleService.modifyArticle(
      userId,
      articleId,
      title,
      content,
    );

    return res;
  }

  @UseGuards(JwtAuthGuard)
  @Delete('/:id')
  async deleteArticle(@Param('id') id, @User() user) {
    const userId = user.id;
    const articleId = id;

    const res = await this.articleService.removeArticle(userId, articleId);

    return res;
  }
}
article.service.ts
// article.service.ts
import { Injectable, UnauthorizedException } from '@nestjs/common';
import { InjectRepository } from '@nestjs/typeorm';
import { ArticleEntity } from 'src/entities/article.entity';
import { Repository, UpdateResult } from 'typeorm';

@Injectable()
export class ArticleService {
  constructor(
    @InjectRepository(ArticleEntity)
    private readonly articleRepository: Repository<ArticleEntity>,
  ) {}

  async createArticle(title: string, content: string, userId: string) {
    const article = await this.articleRepository.save({
      title: title,
      content: content,
      userId: userId,
    });

    return article;
  }

  async getArticle(articleId: string) {
    const article = await this.articleRepository.findOne({
      where: {
        id: articleId,
      },
    });

    return article;
  }

  async modifyArticle(
    userId: string,
    articleId: string,
    title: string,
    content: string,
  ) {
    const article = await this.articleRepository.findOne({
      where: {
        id: articleId,
        userId: userId,
      },
    });

    if (!article) {
      throw new UnauthorizedException('본인의 게시글이 아닙니다.');
    }

    const updateResult = await this.articleRepository.update(
      { id: articleId },
      {
        title: title,
        content: content,
      },
    );

    return { affected: updateResult?.affected };
  }

  async removeArticle(userId: string, articleId: string) {
    const deleteResult = await this.articleRepository.softDelete({
      id: articleId,
      userId: userId,
    });

    return { affected: deleteResult?.affected };
  }
}
app.module.ts
import { Module } from '@nestjs/common';
import { TypeOrmModule } from '@nestjs/typeorm';
import * as path from 'path';
import { AppController } from './app.controller';
import { AppService } from './app.service';
import { UserModule } from './res/user/user.module';
import { ConfigModule, ConfigService } from '@nestjs/config';
import { AuthModule } from './auth/auth.module';
import { ArticleModule } from './res/article/article.module';

console.log(`.env.${process.env.NODE_ENV}`);

@Module({
  imports: [
    ConfigModule.forRoot({
      envFilePath: `.env.${process.env.NODE_ENV}`,
      isGlobal: true,
    }),
    TypeOrmModule.forRootAsync({
      inject: [ConfigService],
      useFactory: (configService: ConfigService) => ({
        retryAttempts: configService.get('NODE_ENV') === 'prod' ? 10 : 1,
        type: 'mysql',
        host: configService.get('DB_HOST'),
        port: Number(configService.get('DB_PORT')),
        database: configService.get('DB_NAME'),
        username: configService.get('DB_USER'),
        password: configService.get('DB_PASSWORD'),
        entities: [path.join(__dirname, '/entities/**/*.entity.{js, ts}')],
        synchronize: false,
        logging: true,
        timezone: 'local',
      }),
    }),
    UserModule,
    AuthModule,
    ArticleModule,
  ],
  controllers: [AppController],
  providers: [AppService],
})
export class AppModule {}
모든 작업이 끝났다면, github에 push 해줍시다. (저는 한번에 커밋하긴 했습니다... ㅎㅎ)
#0-2. 기초부터 따라하는 Nest.js : Git과 Github 사용법
이 글은 아래의 포스팅에 이어서 작성하는 포스팅입니다. https://suloth.tistory.com/45 #1. 기초부터 따라하는 Nest.js : Nest.js 초기 설정 Nest.js란? node.js의 백엔드 프레임워크 중 하나입니다. node.js에는 수
suloth.tistory.com
참고하시라고 올려두는 사진입니다.

'Back-end > 기초부터 따라하는 nest.js' 카테고리의 다른 글
| #11-2. 기초부터 따라하는 Nest.js : Join (0) | 2023.05.15 |
|---|---|
| #11-1. 기초부터 따라하는 Nest.js : Comment CRUD (0) | 2023.05.15 |
| #10-1. 기초부터 따라하는 Nest.js : User Decorator (0) | 2023.05.11 |
| #10. 기초부터 따라하는 Nest.js : JWT 로그인 구현과 Guard(2) - 실전편 (17) | 2023.04.18 |
| #9. 기초부터 따라하는 Nest.js : 로그인의 원리와 Guard(1) - 개념편 (0) | 2023.04.17 |


